Showing posts with label photo-tip. Show all posts

Thursday, 28 November 2013

Panning is Easy

Panning is tracking moving subjects while you shoot them at fairly low shutter speeds. The tracking keeps the subject sharp, and the camera movement blurs the background. Like so: Family Transport

I kept the motorcycle and its riders at the same spot in the frame, so it is mostly sharp. But because I moved the camera to achieve that, the background is blurred (streaked, to be exact).

When I show a panning shot to another photographer, I often get comments about how difficult it is. That's nice to hear, but here's a little secret: it isn't.

Panning is easy?

Really. Think of it this way: you're extremely good at tracking without a camera. You do it every time you look at a moving object. Now just do it with a camera in front of your face. You will not need very much practice; it's really the same thing. (It's a little harder with an LCD screen at arms length; I find that a camera with a viewfinder makes this a lot easier.)

Once you're tracking your subject, the only remaining thing is to press the shutter at the right moment. You know, composition and the like. This can be hard with a mobile phone or a cheap point and shoot camera, as they have an annoying delay between pressing the button and taking the picture. With a responsive camera, this too is no big problem.

So why don't mine come out?

Because you're not shooting enough. The problem is that to get a bit of blur in the background, your shutter speed needs to be quite slow. Typically, too slow to get reliably sharp subjects. You will get some unwanted motion blur, be it due to a little wobble, your heartbeat, or not perfectly tracking the subject. To illustrate this, the image above is shot at 1/30th of a second. For a static subject and the same lens the rule of thumb is to use 1/50th or faster. So the shutter speed is too slow for a static shot, and for panning, you're doing something even more difficult: move the camera smoothly and at the right speed to track the subject.

That's why a lot of panning images don't come out. Simply too much blur, because the shutter speed is so low. The solution is simple: shoot a lot of images. Most will be garbage, but mostly likely there'll be few acceptable ones too.

So that's it, this is the key skill of panning: shoot A LOT. Much more than usual. And there will be some gems. Just don't show all the garbage to anyone and you'll be admired for your amazing skills:-)

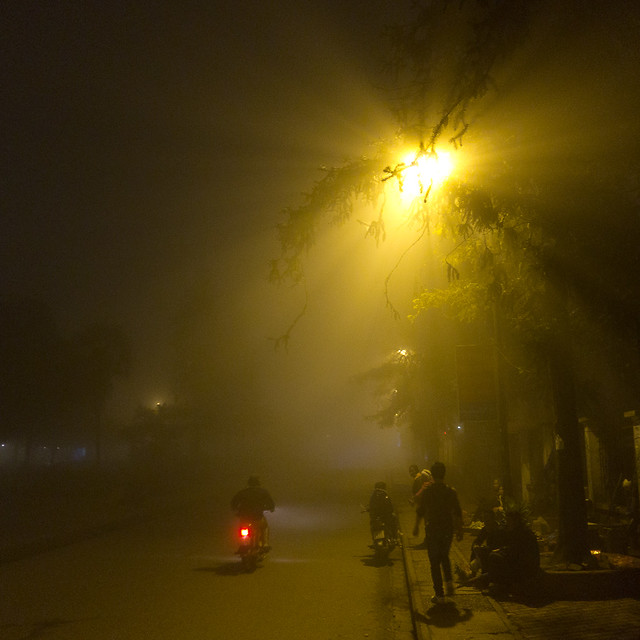
Over time, your skill will improve, and so will your hit rate. Or better, raise your standards with your skill level, so you keep a similar hit rate but with higher quality keepers. At dusk at the edge of the old town in Hanoi

OK, so how do I do this?

Gear and settings:
  • Preferably, use a responsive camera (no long shutter lag) with a viewfinder. Not required, but it saves on practice and improves your hit rate.
  • Set the camera to a mode where you determine the shutter speed (typically, T or Tv); of course, full manual will work if you prefer that. If your camera does not offer that level of control, you're mostly out of luck. All automatic modes will try to avoid slow shutter speeds, so you'll have to shoot in circumstances dark enough to force a suitable shutter speed.
  • Set the camera to continuous auto-focus, if possible. Don't worry too much about that - nobody will notice if the focus is a little off. Motion blur and the likely small aperture will hide that.
  • I usually stick to single shot mode and try to time it well. Burst modes (where the camera rapidly fires off several shots) generally don't work out for me. They make tracking much harder because the viewfinder or screen blacks out or freezes each time it takes a shot. And unless you have a very fast burst mode, timing your shots to hit the subject in the sweet spot can be hard too. One case where I find this a price worth paying is for running animals or people. Their posture changes a lot between shots in a burst, and I found it very hard to catch the right moment by hand. Your mileage may vary, so give burst mode a try and see if and when it works for you.

Start out simple.

  • Pick a simple subject - you want predictable and straight movement, and not too many distractions around. Something like cars or bikes on a straight road.
  • Pick a fixed focal length. Zooming in and out will make it a little harder to get the framing right - remember that the subject will probably be coming closer or moving away! It will also affect the optimal shutter speed. So keep it simple at first, and don't zoom. Start with a middle of the road focal length (say 25-50mm on a crop DSLR, 40-80 on a full frame DSLR).
  • Pick one shutter speed. Say 1/30th of a second. Try it out, and adjust as needed. If everything is one messy blur, pick a faster speed (say, 1/50th). If the background isn't very blurry, pick a slower speed (say, 1/20th).
  • Pick the spot where you want to capture the subject. Get in a stable position as usual, and then twist your upper body towards your approaching subject.
  • Pick and focus on your subject before it gets there, and track it a little past there. And obviously, press the shutter button when it passes the right spot.

As you get better at this (easy doesn't mean no practice) you can start complicating things. Using different focal lengths. Try wide angle or tele. Try subjects coming around a corner. Try it at night, with or without flash, as in the images below. Squat down for a low perspective as in the top shot here (squatting makes the tracking harder). Try smooth backgrounds; try busy and colourful ones. Try athletes or animals, where the posture (and thus the precise timing) is crucial. There is no end.

And remember, nobody needs to know you threw out 100 shots to get that one nice one.

Orange

This is a 0.3 second exposure, hence the massive blur. I've used flash here to get a sharp image of the motorcycle. If you look closely though, you can see the blur of the motorcycle created throughout the entire 0.3s exposure.

Cyclist - Hanoi

A night shot. It doesn't need to be perfectly sharp to work! This is 1/4th of a second, and I'm using my tripod as an improvised monopod (legs folded in).

Thursday, 14 November 2013

Making Tarmac

Manual roadwork near Mongar, Bhutan Manual Roadwork, near Mongar, Bhutan.

These guys are making tarmac by mixing hot molten asphalt with grit. All day long. Roadwork is quite hard, slow, manual work in those quarters. But quite photogenic too...

To get this, I moved around them go get the smoke to be backlit by the sun. Then it was a matter of waiting until the smoke, their bodies and the shovels created a nice composition - I wanted those diagonals.

Tuesday, 5 November 2013

Monk in Punakha Dzong

Monk in Punakha Dzong - 1000 Buddhas shrine in Punakha Dzong, Punakha, Bhutan.

This is in a 1000 Buddhas temple in the monastery that is part of Punakha Dzong, Punakha, Bhutan. The photo-gods were with me that afternoon.

I was walking down a corridor soaking up the atmosphere and gorgeous architecture of the Dzong (a fortress, combining a monastery and government quarters) when I heard 'come' out of a room I passed. This monk was waiting for me there. I put my camera down and had him explain me how to pay my respects to the Buddha. He explained a bit about the room and the 1000 buddhas. I was just beginning to wonder how to bring up the subject of a picture - always a bit difficult when it comes to religion - when he pointed to my camera, still sitting on the floor, and simply said - 'camera'. I snapped this portrait.

One that should not have been, as ISO 800 was not good enough: 1/5th of a second is a tad slow at 127mm... But as said, the photo gods were with me. Good karma. It's not critically sharp but I doubt you'll notice on the web. Love this shot anyway.

(I took two more almost identical shots, seconds later, at more reasonable shutter speeds, but you can see his smile slowly drop. Expression over perfection, for me.)

When I was about to say my goodbye to him, he referred to me as father. A touching end to a brief meeting I will remember for a long time.

Thursday, 16 August 2012

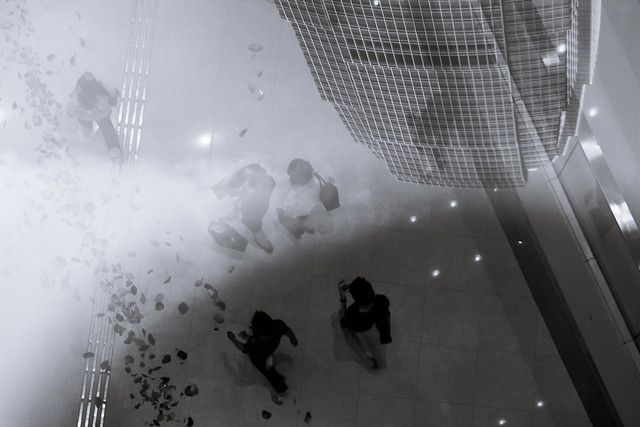
Shopping Nirvana

Shopping Nirvana

A slightly strange photo. Probably mostly interesting photographers, especially if you are intrigued by reflections (and polariser filters). Others may want to keep moving, nothing to see here.

I shot this from the roof terrace of ifc mall, down through a light well to a corridor down below. The floaty things are decorations suspended from the ceiling, above the shoppers.

All of that is overlaid with a reflection of ifc2 (some 400m or 1300ft tall) looming above me, and the sky. The dark crescent at the bottom is actually the shadow of my own head. In that shadow, there is no reflection to speak of, so you see the shoppers quite clearly there.

I shot this in colour, but converted to black and white digitally. That conversion was very interesting. In most digital processing software, you can determine how to 'mix' the different colours to shades of grey. For example, make the blues darker shades of grey, and the reds brighter.

The reflection was mostly blue sky. Now if you push the mix to render blues very light, the entire top half becomes white. The reflection becomes so bright it overpowers the view down, leaving only a (boring) reflection of ifc2 on a white sky.

If on the other hand you push the blues to be very dark, the reflection almost disappears, and you have a clear view straight down.

I played with that a bit and decided to mix the reflection with the view down, for a slightly disorienting, dreamy look.

The curious thing was that I could regulate the amount of reflection with one slider, digitally, at home on my computer. Normally that takes a polariser filter, when you take the shot, with no options to do anything like that digital post processing.

I'd always heard and believed that you cannot do polarisation in post processing. As it turns out, sometimes you can, at least if you convert to B&W.

As I said, interesting mostly for photographers:-)

Thursday, 29 September 2011

The Perfect Camera

More fog

The perfect camera does not exist. There is no camera with the control and quality of a medium format technical camera, the versatility, handling, low light performance and responsiveness of a DSLR, and with the ease of use, size and cost of a point and shoot. So the name of the game is compromise. You will have to sacrifice some less important features to get the ones that are important to you.

My Compromise

I already have a nice DSLR and I love it. But have found it has one big drawback. It is too big and heavy, and too conspicuous to have on me all the time. So I miss shots because it is at home. To fill that gap, I wanted a small truly pocket-able camera, with good quality, decent low light performance, and most of the control that my DSLR gives me. For me, the Canon S95 perfectly fills that gap. (The new S100 which is soon to come would probably be even better.)

Pros:

  • small and light (easily slips in a trouser or shirt pocket)
  • excellent picture quality in most circumstances
  • decent low light performer, helped by image stabilisation and an f/2.0 lens (though only at wide angle)
  • shoots RAW, and has all the controls I need (PASM modes, plus the usual scene modes)
  • clever controls, such as the dial around the lens, partly make up for a shortage of dedicated buttons
  • good 720p HD video

Cons:

  • small (so hard to hold well)
  • short battery life
  • no focusing and only digital zoom during video
  • no viewfinder (which would help better framing)
  • not as fast or responsive as a DSLR
  • not as good in low light as a DSLR

Competitors like the Canon G12 (which has the same sensor), Nikon P7000, Olympus XZ-1 and Panasonic LX5 reduce these drawbacks. But they're bigger, would not fit in a jeans pocket, and would be at home much more often.

The same holds even stronger for the compact system cameras (such as the Olympus PEN, Panasonic G, Nikon 1, and Sony NEX families): they get quite close to a DSLR in quality and versatility, but in a small package. But they're not cheap, and not small enough to have always with me (jeans pockets!).

Which is why the S95 is the best compromise for me as a second camera. Together with a DSLR it does almost all I want, and the overlap (where both work fine) is remarkably big! (The shot above was taken with it.)

Your Compromise

Your best camera will depend on what you want to do with it, on your budget, and on what you already have. Assuming you are serious about photography, here are some suggestions.

If you want one small camera to do it all, but jeans pocket size is not a requirement, and you can afford it, then the Olympus, Panasonic or Sony compact system cameras may be the ticket. I suspect (but may be proven wrong) that the Nikon 1 won't have the image quality for these users.

If you are less concerned about size, go for a DSLR. If it's your first, pick the brand your friends have.

If you are thinking of a Fuji X100, a Leica M, or some other "niche" camera, you should know why they are the best for you and should not need advice like this:-)

For second cameras, think of the S95 and the competitors I mentioned above, but also your iPhone, or a standard point and shoot. Any new smart phone or recent point and shoot will take great pictures in most circumstances. Consider saving the money for lenses for your first camera.

Sunday, 11 September 2011

Street Portraits

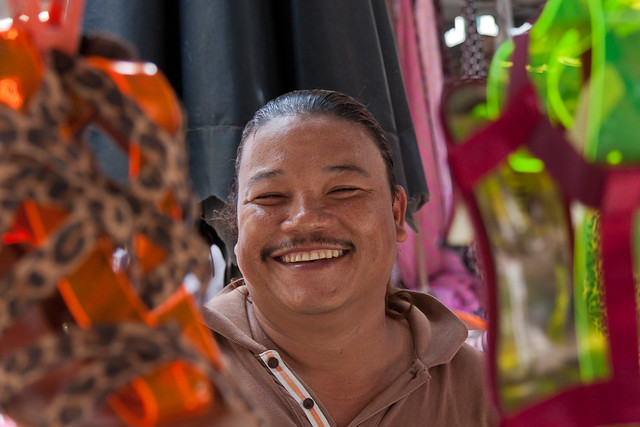
Shoe Salesman

For street scenes I am quite happy to take candid shots. But for "close" people shots like this one I generally don't like sneaking the shot when they are unaware. Nor do I like just shoving the camera in someone's face and taking their picture. Which leaves me one option: ask for permission.

Asking a stranger may sound like a daunting prospect. Until recently, I was a bit apprehensive too. But a trip to a market here got me over that.

First of all - just do it, it truly isn't that hard. Hardly anybody minds being asked, and you will be surprised at how many people are fine with being photographed.

It is easier if you go with a few other photographers. And it is a lot easier in a place like District 4 in Ho Chi Minh City. Formerly notorious as the 'mafia' area in the city, it is still poor. But the people are amazing. Hospitable, friendly, and many are even eager to be photographed. Nice combo with a rich crop in characters and photogenic faces.

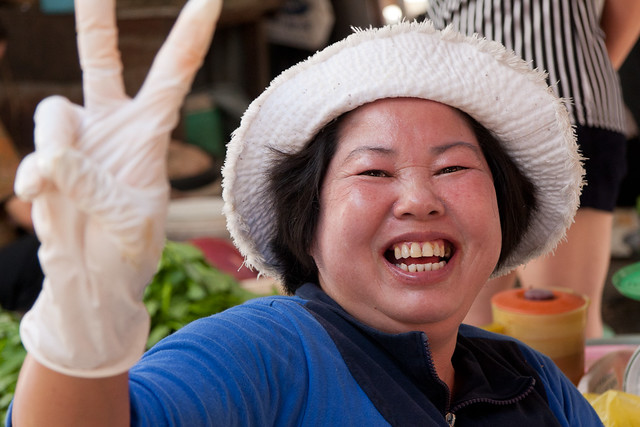
Vietnam is a good place in general for people photography for these same reasons, especially outside touristy areas. People like being photographed, and they make for good subjects. And they easily engage with you, making for quite natural portraits. I've had very little trouble with badly posed and stiff pictures here. The only sometimes annoying habit is the V sign. But some people pull that off too:-)

Hi! More Later!

Monday, 14 March 2011

Don't Wait...

for a better opportunity. In photography, I mean. (No life lessons on this blog.) Take it when you can. If you get a better opportunity later, you can always chuck the first shot. If not, at least you got it.

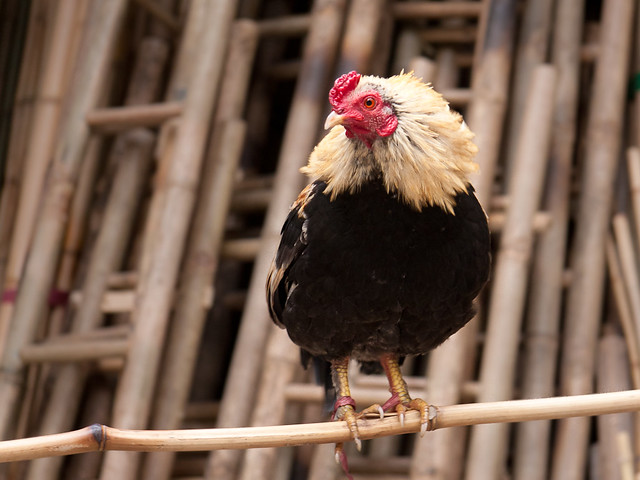
Chicken in Bamboo Street

For example, the above shot is of a random chicken on the street in Hanoi. It now serves as a meagre surrogate for the rooster that used to sit on the street corner opposite the Intercontinental Hotel in HCMC. The story would have been so much better...

Tuesday, 8 March 2011

Circling

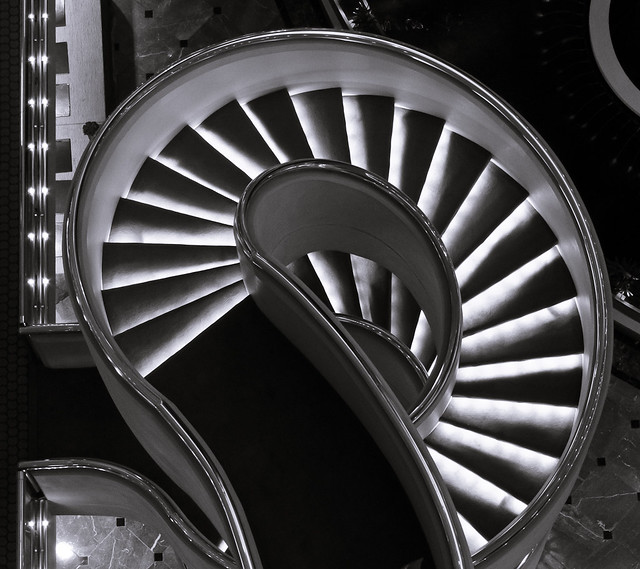
Another spiral stairwell

Simple tip to improve your photography, in two parts:
  1. shoot more;
  2. show only the best.
For example, I took the above shot because I liked the curve and lighting of this spiral stairwell in the atrium of a hotel. I also took 27 other shots of the same stairwell. From the 6th floor down to the 3rd floor; from straight down to oblique angles; from below; with people on it, etc. Some of these 27 are OK, some are horrible, and most are boring. None are as good as this one, and none will ever be shown.

Why does this work (for me)?

Trying all these different angles helps me hone in on the 'best' angle. Some people just walk around their subject and look, and then take one shot. Some take even more shots than I do. But you'll get many more good shots by giving your subject a good look first. Experience (by shooting a lot) also helps of course.

And only showing the best gives me slightly better odds of not looking like an idiot with a too-expensive camera.

Oh, and in case you think this is very clever - this approach is far from original.

Sunday, 13 February 2011

Beautiful Bali: Damselfly

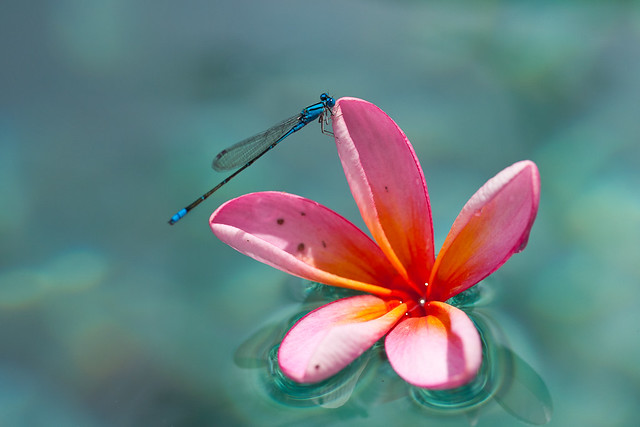
Damselfly

I took this in the pool in Bali. It wasn't as hard as it may seem. These flowers dropped in the pool all the time, and they attracted the little damselfly (it's about an inch long). The pool had a slight current towards the drain, so all I had to do is be ready with my camera in the pool, downstream, and wait till they drift by. That way I did not startle them and got quite close.

Minor disadvantage: without sun screen, you get a nasty sunburn when you spend a lot of time in the pool. Especially when you start out as pasty white as I was. (I turned a beautiful crimson red afterwards.)

UPDATE: I believe this is a Blue Tailed Damselfly, and it sits on a Frangipani flower.